Showing posts with label St. Patricks Day Creative Arts. Show all posts

Thursday, March 10, 2011

Rain~Bro's an Irish Brothers Playdate


This colorful playdate was inspired by St. Patrick's Day and the fact that I'd be spending a morning with four little Irishmen which also happen to be brothers! When I think about St. Patrick's Day from my childhood it always included rainbows the idea of following one all the way to the end to find the Leprechauns pot of gold.  Being a mom is so magical and this playdate captured that butterfly feeling that as mother we experience with the excitement, wonder, joy and active imaginations of the little people in our lives.
This playdate can be recreated for less than $20.00 using the supplies you have from around the house.  For this playdate you will need the following supplies:

Rainbow Pasta Craft Supplies:

Several pieces of card stock for rainbow arch
Large sharpie pen for outlining
Two boxes of pinwheel pasta
One bottle of white vinegar
Classic elmers glue
Food coloring

Rainbow Dessert:

Milk
Vanilla pudding mix
Plastic cups to mix with different colors
Jumbo craft popcicle sticks
Food Coloring

Guess what this is pasta :) I know so magical and easy to do! I love this variation to the "fruit loop" rainbows that many mamas are doing right now.  Since my little person loves to get them I though this would be a great alternative. Not to mention it saves time because you don't have to sort the colors. 

 I just used the mini pinwheel pasta that was on sale and added one tablespoon of white vinegar into the plastic zip lock bags and shook them so all of the pasted was saturated. Then as you see below I just added my desired rainbow colors using a variation of standard and neon food colors.  Let your pasta dry on paper towels before use.  I dyed and dried mine the night before then reused my colored bags for storage.
Here is my dyed pasta I would recommend letting them sit in the bags for several minutes so they can absorb the colors.  A few tips on coloring for my red I blended the primary red and pink together from the neon coloring so it would have a friendly red look :) I also combined the pink from the neon color and primary yellow to make a more cheery orange.  My yellow, lime green, aqua blue, and purple "indigo" are also a result of blending the primary and neon colors together.
On standard white card stock I outlined the colors of the rainbow arch for each one of my play date attendees in advance.  I cut the rainbows and helped the kiddos with the rainbow arch glue so they could fill in their rainbows with the colored pasta by following the glue arch.  We only used one color at a time and used fruit loops as an incentive for finishing each rainbow arch color.
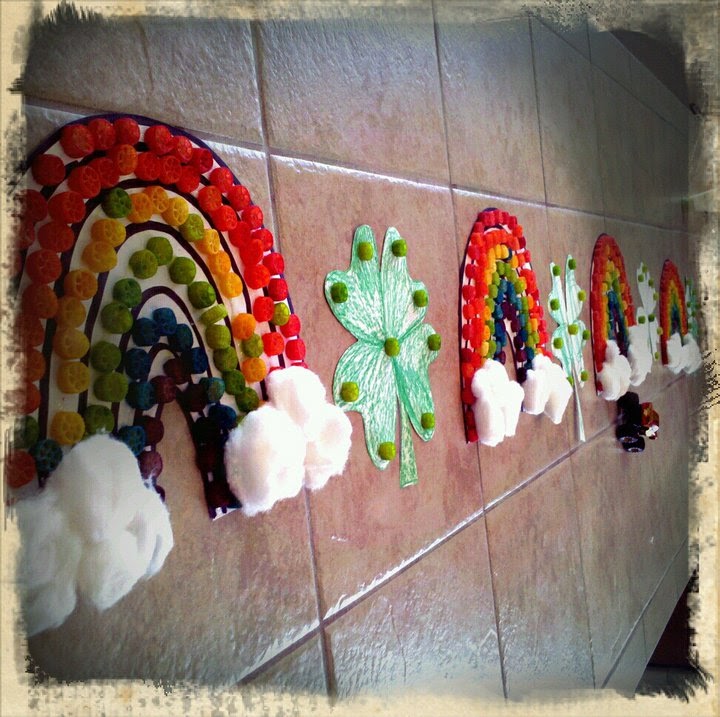
Here is our finished products we of course added cotton ball white puffy clouds and continued the theme and idea with our additional green shamrocks and extra colored pasta.
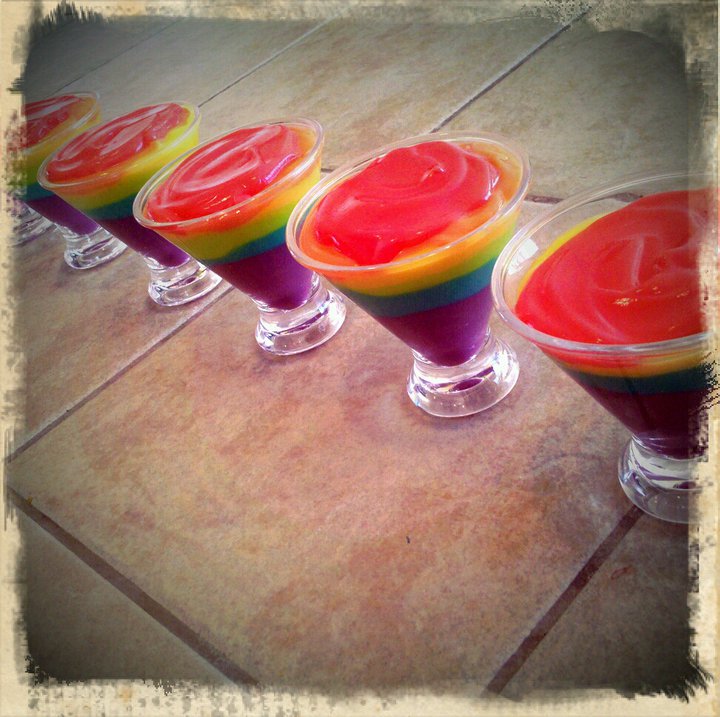
At everyone of my playdates I also like to include a recipe and this was a wonderful dessert that helped teach not only the colors of the rainbow but also the blending of colors.  I first started with my popsicle sticks and labeled them with the colors.  Each boy would then have the opportunity to mix the pudding and the food coloring together to make each part of the rainbow.
As I poured in the pudding I asked the boys to make predictions and observations with what was going to happen to the pudding.  Even though it was a toddler crowd they were over the moon to explain what they thought was going to happen to each color.  I personally love adding those elements of discovery in all of my playdates and it is those moments that make memories for our little people through learning.
Here is the puddling and the colors being added so the boys could mix them. I chose popcile sticks in advance because I knew I wanted to label each cup for an additional learning opportunity plus they were great stirring sticks that could be enjoyed as an extra bonus for all of their hard work.
The boys were delighted with this yummy extra treat! Sometimes its the simple things....I know you remember getting that egg beater as a child :) Always loved watching my mom bake in hopes that I'd be the choosen one for that extra surprise.
Putting them into a desired cup is super easy. I chose to use just some simple plastic cups I had left over from a previous playdate since the boys would be taking them home to share with their family. Hope you enjoyed our Rain~Bro Playdate!


Wednesday, March 9, 2011

Go Green Slime Time Playdate

PlayDates styled by SnapDragon and GingerRoots  have two main ingredients:

A Dash of Whimsy and a Splash of Magic :)

When planning any playdate one must be inspired.  Having a playdate centered around the color green just seemed like the perfect place the start.  Looking through my closet of crafts I happened upon several bags of lime green insects and off I went to create this Slime Time St. Patrick's Playdate.

The total cost of this playdate was five dollars since I had many of the supplies at my house already but it is designed to be a $20.00 or less playdate. Here is the total supply list from the playdate. The beauty of a playdate is that there is no left over supplies or wasted materials.

*You'll just need the following:
*Green Slime
*Various Plastic Bugs or Dinosaurs
*Plastic tubberware or baking dishes and ziplock bags pending on kitchen and playspace
*Various green scrapbooking papers
*Green themed snacks
*Kiddos

First the slime! Seriously it is just as fun for adults as one could imagine.

Slime Time Recipe:

Here are all the ingredients and materials that you will need to complete the project. Borax, Elmers White Glue, Elmers Clear Glue, Water, Neon Food Coloring, Measuring Cups, Measuring Spoons, and Mixing Spoon.
Step One: The Borax Solution

One cup of water
One tablespoon of Borax {I included a picture of this product since it can be tricky to find at the grocery store}
Mix until the Borax is almost completely dissolved and set to one side.  From the picture below you can see that the larger measuring cup is mixed with the Borax Solution.

Step Two: The Glue Solution

One half cup of glue
One half cup of water
Several drops of lime green food coloring
Mix until the water, glue, and food coloring become completely blended.  If you need to add more color now is your last chance :) From the picture above you can see my lime green measuring cup is the Glue Solution.

Now for the magic of Science.  What is super cool about this activity is that is teaches your kiddos about chemical reactions.  When the Glue Solution reacts with the Borax Solution it changes into Slime.  The glue reacts with the sodium in the Borax and actually makes the glue stick to itself.

 Pictured above is the mixing of the Borax and Glue Solutions.  When mixing these solutions together it only takes seconds for the chemical reaction and formation of the Slime.  Instantly you will see the glue change shape in the borax and you will need to collect all of the glue in your hands and dip it back into the Borax Solution until you get the Slime Solution you desire.

Here is my favorite kind of Slime Solution.  I love when it still slimes back and forth into shape.  I used the larger sized throw about  tupperware to serve the purpose of storage, playtime observations, and take home gift.  The Slime Solution can be kept up to two weeks with nightly stays in the refrigerator at night so the growth of mold does not occur. Obviously since this product includes the cleaning solution of Borax it is not for consumption.

To add more whimsy to the playdate I also added dinosaurs and glow bugs to the solution for added magic.


When you add the clear glue instead of the classic elmers school glue you get this super cool effect.

It is imporant to remember that when you are mixing the solutions that you are not going to use all of the borax solution.  It will just be used to react with the glue solution.  When I  tried making my first clear solution I left it in the Borax Solution for a little too long :) Still really cool to play with my not as slimy more of a putty substance.
Use creative jars to give you slime to your guests they will be so delighted :) I used these baby jars for both decoration and storage of your slime.  If you are making this for a playdate I recommend making it for your kiddos.  If the slime is stored over night it just isn't that slimy the next day.


Here are some highlights of our playdate!

We added dinosaurs to our Green Slime Time as suggested by my son. So awesome that he too comes up with creative touches at two for our guests.
I also used left over scrapbooking paper from my "Hanging with my Gnomies Playdate".  This is a very Shoppertunistic idea I learned from my friend Tiffany at Become Shoppertunistic.{Become Shoppertunistic Facebook Page Here}  I love the glam factor this sparkle paper brings.
Tiffany also provided jello jigglers "slime" to our playdate too! So awesome to have friends who also love to contribute to your playdates!
Your kiddos will love this slime too such a classic from childhood.  I really think that's what adds the magic to any playdate bringing together elements that both children and adults think is fun.

While I was making the slime for my little people I made Green playdough in advance so they could play with it before and during the time the slime was being made. Its the teacher in me to keep little people busy during transition times. This playdough recipe is the best I have ever used and will be found in the recipe section of my blog.

Seriously the looks on all of their faces is priceless not to mention that this entire playdate for me was just the cost of the tupperware.  I decided to use it to contain the slime and for a take home item but you could use a variety of things from around the kitchen including cookie sheets for playtime and ziplock bags for take home.
Oh so slimy but oh so cool! Even being thirty something I love to play with slime and was so gitty to be able to host this playdate for the little menfolk in my life.  All of my grown up friends wanted to attend this playdate too and commented that I was the coolest mom for making slime at my house.
So how this chemical reaction can also be seen in the eyes of our children :) So magical
This was a very manageable no mess playdate although it is called slime it does not slick to little fingers or plastic dino's or bugs.  We'd love to see your Green Slime time too.  Leave us a picture or comment we'd love to hear from you and  your playdate.

Monday, February 28, 2011

ShamRockin Craft Inspirations

Amazing St. Patrick's Party Ideas and Free Printables :
Remember to Click on the Links Highlighted in GREEN to View the Entire ShamRockin Craft Inspiration

Frugal With a Flourish

Love, love, love this decor for the door.
Check out this amazing home decor site
{Frugal With A Flourish}

Bird's Party

Check out this amazing site and their St. Patrick's Day Inspired Party Ideas

{Funky Polkadot Giraffe}

Lucky Us! Itsy Belle is such an amazing site you need to check out her posh party styling.
{Itsy Belle} Site Click Here

Saturday, February 26, 2011

ShamRockin Irish Stache

A ShamRock' Good Time

These whimsical photo props are envouge and I couldn't resist making them of an upcoming St. Patricks Day Play Date that I will be styling.  Here is a sneak peek of my ShamRockin Irish Stache.   More St. Patricks Day Photo props coming soon.....


I made this ShamRockin Stache with in less than 10 minutes and under a dollar but all the pictures will be priceless


A Stache on a stick will bring a lot of joy to your St. Patricks Day where ever you are :)


Wednesday, February 23, 2011

Sham~Rockin' Damask Garland


Sham~Rockin Garland

Create this simple and easy St. Patrick's Day inspired Sham~Rockin' Garland

Supplies: Fabric, Freezer Wrap Paper, Card stock for Shamrock Patter, Twine, Clothes Pins, and Ribbon.

Shamrock Template
To make any shamrock just connect three heart shapes together.  Searching the web for Shamrock outlines will also give you lots of options too. Just print on card stock and cut it out and you have an instant template. On a side note, I would recommend using an hobby knife verses scissors just to make the job faster and more precious. 


To prepare your fabric for this project iron reverse side and then place the freezer paper shinny side down and iron on the highest setting.  The freezer paper will adhere to the back of the fabric and stabilize it for the project.  Then use your template and trace your shamrock and cut our your designs.  If the paper releases from the fabric no worries just iron again and it will re~adhere to the fabric.


The freezer paper helps stabilize the fabric for cutting out the design pending on the desired look of the project it can be left on the fabric or removed.

Love the overall look of this Sham~rock and the use of ribbon for the green elements of St. Patrick's Day.
Here is the end result of the Sham~rockin' project.  I love the use of twine and clothes pins because it reminds me of my childhood.  It's simple and could be added to as the holiday grows closer which is something that I love :) My overall vision is to add Vintage Irish Prints and Quotes.  This is what I have so far and can't wait to see how it transforms.


Love the black and white contrast this adds to my windows.
I added polka dot lime green and white ribbon to incorporate the St. Patricks theme.

To tie together my garland I added these decorative flowers to each end of my garland.